Overview: This article will introduce the procedure to set up an SD Camera for a wireless router via the camera’s web GUI interface and a web browser.
Technical Note: Be sure the camera is plugged in via an Ethernet cable to the same router the computer is connect to and launch the IP Search Tool. Disable to Pop Up Blockers or any virtual network drivers that may be installed on the host computer. The Pop Up Blocker will interfere with the configuration process for the camera. The virtual network drivers may interfere with the IP Search Tool from accessing the local network.
Step 1: Obtain the IP Address of the camera.
1) To login to the camera use IP Search Tool to obtain the IP address for the camera.
2) Launch a web browser (Safari for Mac/IE or Edge for Windows if this is the first time)
3) Enter the IP address and port number of the camera into the address bar of the web browser.
4) Login to the camera.
Step 2: Configure the wireless network settings.
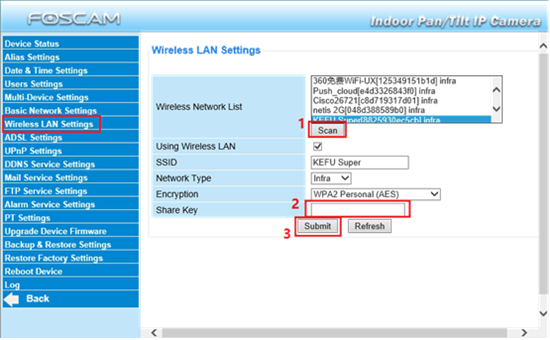
• After logging into the camera’s webpage navigate to Device Manager → Wireless LAN Settings

1) Click the “Scan” button to have the camera search the area for WIFI network signals. It may take up to two tries for networks to be displayed.
2) Once networks are listed select the correct SSID (name) from the list of available networks.
3) After the network is selected the basic information for the network will be auto populated on the screen. Input the WIFI password in the “Shared Key” section and click on the “Submit” button to save the configuration to the camera.
4) The camera is now going to reboot.
Step 3: Camera connection to the WIFI network.
• Allow approximately 45 seconds for the camera to reboot.
• Unplug the ethernet cable from the camera.
• If the Equipment Search Tool was launched the camera is going to disappear from the list. This is normal.
• Once the ethernet cable is unplugged from the camera the wireless networking module of the camera will take over and attempt to login to the wireless router. It may take up to two minutes for this to complete.
• If the IP Search Tool was launched and the computer is connected to the same network/router it will reappear on the screen with the new IP address it was assigned.
• The camera should now be accessible via the new IP address across the wireless network. (Assuming the router the computer is connected to is part of the same network.)
• Camera’s with the voice prompt feature will announce WIFI Connection Succeeded.
